Ableton Live’s Pack feature presents an excellent way to archive Live Projects for backing them up, sharing them with collaborators, or for creating a showcase for your loops, presets, and sound design skills that you can sell or distribute as your own product. Live Packs archive the Live Set session file, as well as its audio clips, MIDI clips, and Live device presets, such as Instrument and Effect Racks.
If you’re like many electronic musicians, you have tons of unfinished projects lying around. You could easily take the best elements from those projects and make a Pack for Live users to enjoy.
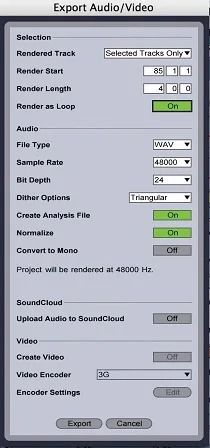
Open those sessions and pick out the best audio or MIDI tracks. Chop audio into loopable bits and choose File > Export Audio. In the dialogue box (Figure 1) make sure Render as Loop is on and select the audio file type and resolution that you will use for your entire Pack. (Don’t render to a resolution above the session’s original quality.) Then export to a new folder where you’ll export all your Pack files. Do the same for audio one-shots, turning the Render as Loop option off. Alternately, you could right-click on audio clips and choose one of the Convert to MIDI options (Figure 2). The resulting MIDI will probably need some cleaning up before you export it. Right-click on those and any other MIDI clips and choose Export MIDI Clip from the menu to save them to your Pack folder.
The best DAWs 2020: the best music production software for PC and Mac
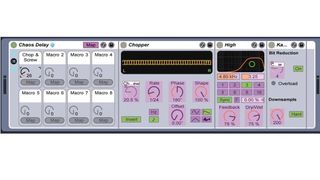
You should also save your best instrument and effect chains as Racks. Multi-select all the devices in a chain and hit Command-G to group them into a rack. Hit Command-R to rename the rack as something descriptive and/or clever. Then open the Rack’s Macro Control pane and click Map. Now click one of the most used parameters in any of the devices and then click a Macro Map button to assign it to a Macro control. Stack more than one control on each Macro and then rename that control appropriately (Figure 3). The more creative and useful your Racks and Macro controls are, the greater your Pack will be. Lastly, save the Rack to your Library with the Rack’s Save Preset button.
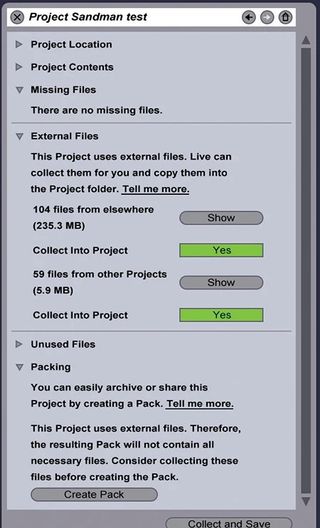
Now start a new Live Set and build a Session view collection of grouped tracks using your folder of MIDI and audio loops and one-shots, as well as your Rack devices, labelling the tracks appropriately archiving your Project file as a Pack is a straightforward process. Choose File > Manage Files from the menu to open the File Management panel on the far right of the Live window. There, click the Manage Project button. On the next screen under External Files, you’ll see if there are any presets, samples, etc. located outside the Project folder. If so, you must select Collect Into Project and then hit Collect and Save. When that’s finished, you can hit the Create Pack button, which lets you name the Pack before it exports your Pack as a .alp file, using lossless compression to reduce the file size by up to 50 per cent.

Many people sell their Live Pack digital files over the Internet or simply share them with the public or with musical collaborators. You could also use them as promotional or add-on content. However you play it, spread the word to the Ableton forum, Ableton User Groups, or production blogs, or shop it around to soundware companies. The possibilities for getting it out there are almost as endless as the material you can create.
