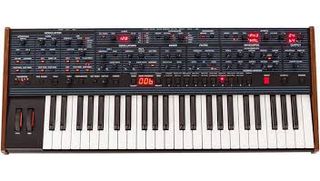
It’s no exaggeration to say that Dave Smith Instruments’ new OB-6, a true collaboration with Tom Oberheim, has quickly become one of the most talked-about analogue polysynths of the 21st century. By combining elements of Smith’s own Prophet 6 with the filter topology of the Oberheim SEM, the OB-6 is capable of textures that are unlike any other analogue poly to date.
For this Master Class, I won’t be rehashing the generalities of analog synthesis. Instead, the focus is on programming tricks and techniques that highlight the possibilities lurking within the OB- 6. It’s also worth noting that several of the tricks in this Master Class also apply to the Prophet 6, thanks to its similar architecture, so proud owners of that synth may find a few tidbits they can use as well.
SEM filters
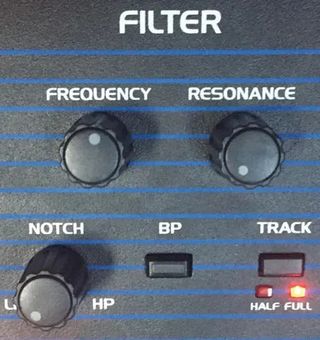
The cornerstone of the OB-6 sound is its spot-on re-creation of the original Oberheim SEM state-variable filter, which lets sound designers smoothly morph the filter slope from lowpass to notch to highpass (see Figure 1). Alternately, the filter can be switched to bandpass mode for a different range of textures. What’s more, the filter includes its own dedicated velocity-sensitive envelope that can also be inverted.
Notch layering
One of the simplest tricks for getting pseudo-layered effects is to create a soft sawtooth pad while in lowpass mode. Once the basic pad is in place, slowly shift the filter mode toward Notch until you hear a touch of “fizz.” From there, adjust the resonance and cutoff slightly to get the pad to sit properly. If you goo too far into notch, you may lose too many lows, but ultimately it’s a matter of preference. The end result should sound like a layered patch with a warm pad topped with a bit of stringy high frequencies. Best of all, with a little fine-tuning of the cutoff and filter state, airy choirs are a breeze.
Analogue Phaser
While the OB-6 has its own Oberheim-inspired phaser effects built into the digital effects section, analogue purists will be pleased to discover that if you set the filter mode to notch-only (12 o’clock) and the cutoff frequency to 50%, you can use a sine wave LFO to sweep the filter frequency slowly, resulting in a 100% analogue phaser effect that’s quite compelling on its own.
Rhythmic Resonance
Modulating a resonant filter with a random (sample-and-hold) LFO is an effective method for recapturing that ’80s synthpop vibe, but with the OB-6, you can do it with a lot more control. Start by creating a basic one or two-oscillator patch with both the filter and amp envelopes set to zero attack, decay, and release with maximum sustain. Next, set the filter mode to lowpass only, with cutoff set to zero and resonance at maximum. Finally, set the filter envelope modulation amount to 50% (around 3 o’clock) and turn the velocity sensitivity on for the filter envelope and off for the volume envelope. Now, the harder you hit a key, the higher the cutoff frequency. Thus, you can now control the “random” patterns in your DAW by simply changing the velocities for each note event. Better still, the results are polyphonic.
Another classic, but often overlooked, trick for working with filter envelopes is inverting them (see Fig. 2). Even seasoned pros skip this feature because it doesn’t behave in an intuitive manner, so here’s an easy way to get the hang of applying them.
Inverted Envelopes
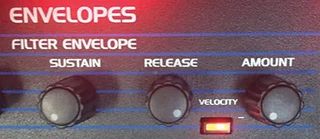
1. Since the envelope is inverted, the cutoff frequency is lowered by the envelope, instead of its normal positive movement, so it’s best to start with a cutoff frequency around 50% when you start working with the envelope.
2. Set the envelope amount to -50% (around 9 o’clock) when you’re adding the inverted modulation. Also, start with the sustain value at zero, so when the filter reaches the sustain, the cutoff will return to its front panel default value. (Leave the release at zero too, as it will make things less confusing as you experiment.)
3. And now the secret: With the filter envelope set up in this manner, there will always be an instant attack, followed by a decay (the attack time). When that decay reaches zero (the amount subtracted by the negative envelope amount), the decay section will kick in, serving as a second attack segment that “rises” to the sustain value. Boom! You’ve got a new envelope shape to play with.
The wonders of X-MOD
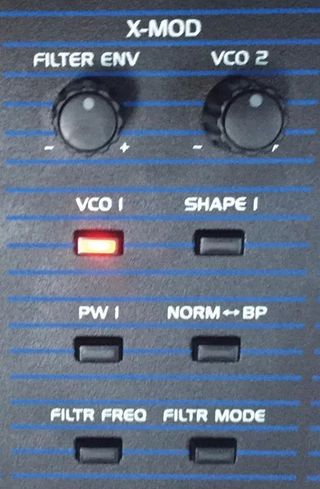
In many ways, the OB-6’s X-Mod section is a variation on the classic Prophet Poly-Mod section, with its integration of both the filter envelope and oscillator 2 as modulation sources that can be applied to a wide array of synth parameters (see Figure 3). Naturally, filter cutoff and the pitch and/or pulse width of VCO 1 are destinations, but because of the synth’s Oberheim heritage, there are several unique additions like sweeping the filter mode, as well as the ability to sweep the waveshape of VCO 1, like the Prophet 6.
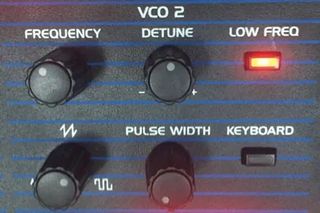
This may be obvious to seasoned programmers, but for those who are new to the X-Mod (and Poly-Mod) approach, it’s worth mentioning that you can use VCO 2 as a second LFO by simply hitting the Low Freq switch and turning keyboard tracking off (see Figure 4). Modular fans use this technique all the time, but having it on a dedicated hardware synth opens a lot of new doors for modulation options. The secret is to stick to small modulation amounts from VCO 2 as you begin your experiments and stick to pitch and/or filter frequency as your destinations. Once you get the hang of it, turn keyboard tracking back on and you’ll have an LFO that increases in speed as you play higher on the keyboard.
X-Mod Bells
If you’re into metallic, clangorous tones, using the X-Mod section to apply audio rate modulation from VCO 2 to the pitch of VCO 1 is a fantastic resource for bells and chimes. Just leave VCO 2’s Low Freq mode in the off position with keyboard tracking active. Set the shape to a triangle wave, then tinker with the overall modulation amount in the X-Mod section, while simultaneously adjusting VCO 2’s pitch. To be clear, there is no one “right” sound here, so it’s a matter of experimenting with those two parameters (keeping the modulation depth at relatively minimal levels) until you find a set of overtones that track the keyboard in a musical manner. At this point, the sound may be extremely harsh, so for the finishing touch, use a lowpass filter set to around 40% to 50% with maximum resonance and keyboard tracking on.
Talkbox effects
Routing the VCO 2 modulation to the pitch of VCO 1 and Filter Freq simultaneously is a cool way to get analogue “talk box” effects. Start by setting the frequency of VCO 1 to C1 and the frequency of VCO 2 to C4, leaving Low Freq mode off and keyboard tracking on—and setting VCO 2’s shape to a 50/50 square wave. In the mixer section, use only the output of VCO 1. Next, in the X-Mod section, set the VCO 2 modulation amount to around 2 o’clock. Finally, set the filter mode to lowpass with resonance at maximum and grab the cutoff frequency knob. While playing notes, shift the filter frequency knob in the 0% to 50% range. If you’ve set it all up correctly, you’ll be greeted with a Daft Punk-ish talkbox effect with the vowel type controlled by the filter cutoff. Once you get a feel for it, try adding a bit of filter envelope to automate the “talking.”
Other tricks
While the SEM filter and X-Mod sections are arguably the highlights of the OB-6 architecture, there are quite a few other tricks that it can do, thanks to its hands-on aftertouch section and unique combination of detuning and chord memory features.
Noise modulation
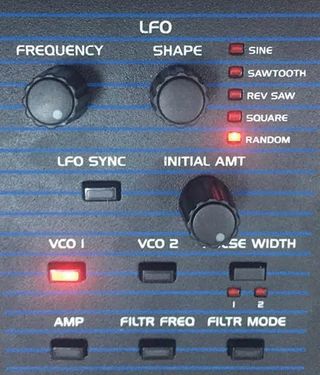
While the LFO’s waveform selector doesn’t explicitly include a noise option, if you turn the LFO frequency to maximum while the random waveform is selected, the result will be exactly that: White noise (see Figure 5). And if you haven’t already experimented with noise as a modulation source, you’re in for a treat.
1. Tune both VCOs to the same pitch, with no detuning, then apply a small amounts of noise modulation to the pitch of either VCO (individually, not both) and the result will be very similar to the classic supersaw effect that’s all the rage in EDM these days.
2. Routing noise modulation to the filter cutoff will add a distortion-like grunge to almost any patch.
3. Applying noise modulation to pulse-width in extreme amounts will convert that oscillator’s overall tone into noise, with a tiny bit of the original pitch mixed in, which is extremely useful for exotic drum and percussion effects.
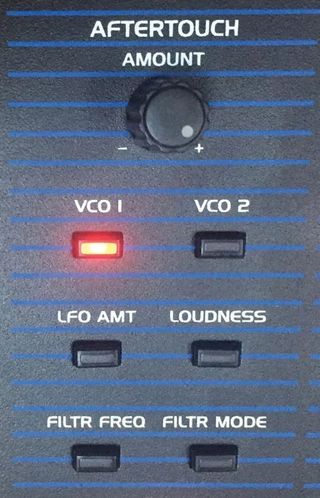
While most classic hard sync patches rely on an envelope to sweep the pitch of the synced oscillator (VCO 1 on the OB-6), if you use aftertouch to modulate the sweep, you can create extremely dynamic leads that shift and morph as you apply pressure to the keys (see Figure 6). For extra credit, add a longish delay to the result for ultra-progressive results.
Aftertouch controlled hard sync
Stacked leads and risers
Both the Prophet 6 and OB-6 allow for old-school chord memory tricks by simply hitting the Unison button while holding a chord. This is great for techno-style parallel chord riffs, but if you stick to octaves and fifths, you can use it to create really thick, stacked leads. As an example, hold down C in three octaves, then hit the unison button. From there, increase the detune amount until it starts to go too far out of tune, then back off it a bit. The results will be massive. What’s more, if you turn on portamento and set its knob to 80% or higher, the result will be quite reminiscent of the THX sweep, perfect for massive EDM risers, especially with a bit of delay and reverb as frosting.
